Is this the correct package for me?
The EHR Connector provides a standard, relatively user-friendly, way of sending photos from the MedImage app directly into the patient record of many EHR (Electronic Health Record) systems. Currently compatible systems are:
- MedTech32
- MedTech Evolution
- AtomJump Messaging
If your EHR has not already been added to the ‘compatible list’ of systems, you may find it difficult to make this add-on product work for you, depending on your technical level. The standard basic MedImage Server without the EHR Connector may be simpler, which allows you to target the correct folder for your photos to go, but still requires you to manually add the photo through your EHR interface to the particular patient. However, there are still some options available for you if you want this to work, below.
Non-compatible systems
If your EHR system is not currently compatible:
As an end-user, with the EHR Connector, you have some options:
1. Write your own EHR specific queries (which takes some ‘SQL query’ or ‘JSON/SOAP’ ability)
2. Contract MedImage, or a 3rd party, to remotely log into your system and determine the correct set of queries for your EHR system.
3. Request your EHR developers to write the SQL or API requests queries for you, and build an add-on package for general use.
If you’re a developer or system integrator you have several options, also:
1. If the target EHR system has
- an accessible database, and you can make ‘ODBC queries’ against the database,
- a patient’s photo ‘local file path’ field in one of the data tables
then making a working connection will be fairly straightforward with this EHR Connector, as you will only need to determine 3 different SQL queries or URL requests. If you want to publish the connection for others to use, you can duplicate this open source project and replace the 3 queries above, along with providing the relevant ODBC driver for the database.
Or (in ver >= 0.7.0), if your target EHR system has
- a SOAP or JSON API, and
- a query request available to insert a photo filename entry to a patient record (or the capability to POST the photo file itself)
then you can also make a straightforward connection.
2. If you want more control over the connection, or you want to build other functionality, you can make your own general purpose MedImage add-on using the MedImage Open Developer API.
Installation
You will need to install the MedImage Server version ( >= 1.4.5), and for testing purposes, we would recommend trying this on a test server or PC, first, to check everything works in your environment. Please back-up your EHR database before first use – this add-on shouldn’t adversely affect anything, but it is always a safe policy. We would recommend doing this process out-of-hours, so that no users are currently accessing the system, but that depends partly on the type of EHR you have.
Once the MedImage Server is installed, you should download and install the EHR Connector add-on from
http://medimage.co.nz/addon-
To download this, click ‘Start the Free Trial’ from that page – it will take you to the download section.
You can download both the Server software and the EHR Connector add-on as many times as you need to run it on your system. If you don’t find it works in with your set-up, please let us know and we’ll see how we can help.
The MedImage installation service is available if you need on-site or remote assistance in installing this. We offer a ‘free trial’ installation also, though this installation is still paid for if you are happy to purchase the whole product. Otherwise, the installation is not billed.
Please remember that the license is per hardware server, so you will need to purchase a new copy if you plan on running the software on a new site.
To decide on whether to use 32-bit or 64-bit versions of MedImage, you can see this handy guide, particularly for MedTech32 users.
MedTech Specific: for versions < 0.7.0, this software will add photos into the ‘Attachments’ window of MedTech, but not the ‘Inbox’ window, which some doctors have requested. However for versions >= 0.7.0, a note on the Patient Manager ‘Daily Record’ section is added about the photo, as well as in the Attachment Manager.
Post Installation Set-up
1. Once the installation is complete you should install your specific EHR add-on e.g. ‘MedTech32’ from the same page.
IE Browser Specific Note: usually a a prompt will appear in the browser to explain that you need to install the EHR specific add-on. Depending on the security settings of an IE browser, however, this message may not appear. If not, you should find the EHR specific add-on, right click, copy the URL, and paste this address into your Settings / Addons page within the MedImage Server. Then click ‘Download and Install’.
If your EHR is not on the list, you will still be able to change the EHR queries to match your situation, although this takes some technical ability.
2. You should then click the ‘EHR Connector Add-on’ tab to start configuring and testing the connection.
If your queries have not been set up for your specific type of EHR (i.e. you have not installed a specific EHR add-on), you should re-write these in the ‘Advanced options’ section, before going any further.
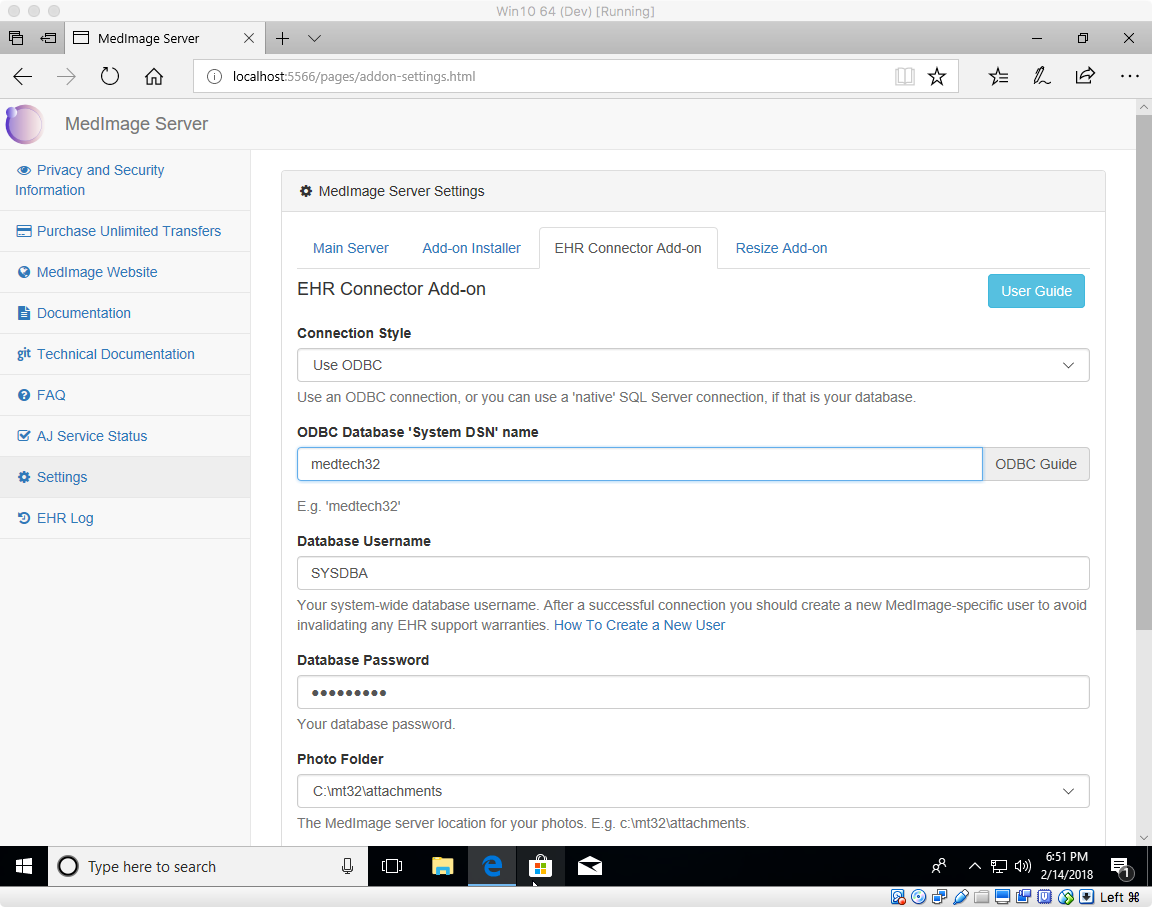
Scrolling down further:

The general approach here is to configure, ‘Save & Check connection’, configure, ‘Save & Check connection’, etc. until you have a green ‘Connection Success’ message showing.
You can preview the ‘Show Extended options’ in this picture, and the ‘Advanced Options’ in this picture and this picture. See the full description of each field here.
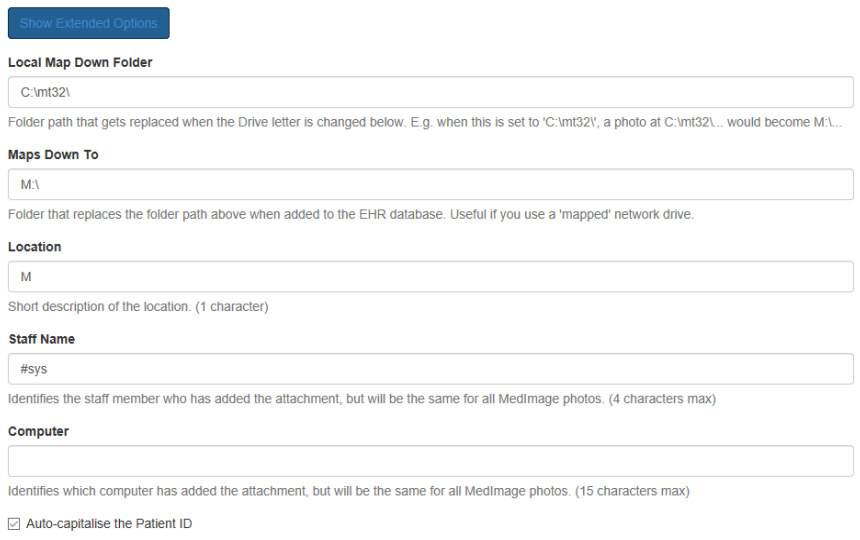
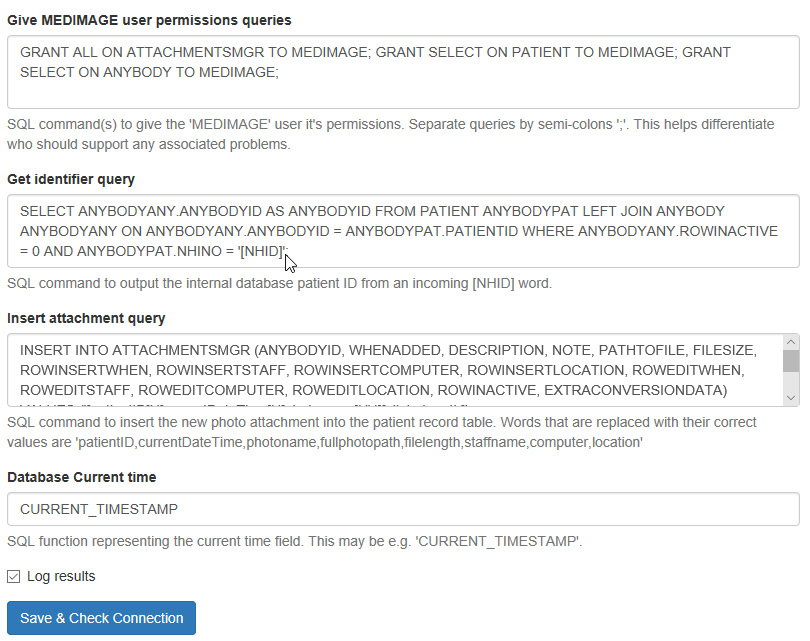
Useful Tip: After you have set up the MedImage Server and EHR Connector, it is often a good idea to create a desktop shortcut on the client PCs, to either the EHR Log page, for error feedback, or the phone syncing result page if a variable number of people might want to sync in to the Server.
Setting up ODBC
You need to create a ‘system’ DSN connection to your EHR database through the Windows ODBC page (enter ‘ODBC’ under your Windows start bar). Make sure you use the 64-bit version or the 32-bit version, depending on the database software installed. There are instructions for specific fields in the EHR Connection Add-on settings page under the ‘ODBC Guide’ link. Test the connection within the ODBC driver to ensure it is working. Then add the name of your ODBC connection back into your MedImage EHR Connector settings page. Save and check the connection once more.
Once you have successfully connected to your EHR database, you are ready to try sending images from your MedImage phone app to your EHR.
Using the app
The app can be used in much the same manner as you would without the EHR add-on installed, but you should be aware of the following:
The preferred format to enter is ‘[Patient ID] [injury name]’, for example ‘BGDH1233 arm’, or if you have the app option ‘ID writes a folder’ off, you will need to add a ‘#’ at the start and enter e.g. ‘#BGDH1233 arm’.
This will create a folder for each patient ID, and include multiple photos within it. While it is possible to modify this recommended structure (under the ‘Advanced Options’), you will need to be technically capable to do so (i.e. have a knowledge of, or the aptitude to learn about ‘regular expressions’).
Once a photo has been sent, you should initially check the status of the photo transfer in the MedImage Server interface, under the ‘EHR Log’ link on the left-hand-side. This page provides an up-to-date log of success or failure, that is refreshed every few seconds. It can take a few seconds from when the app mentions the photo has transferred successfully, to the entry getting displayed here.

Please note:
- You cannot send a photo to an ‘inactive’ patient ID. There will be an error message on the log.
- If a patient ID number is duplicated, this will also return an error, and you will need to manually add the photo to your EHR
- If nothing appears at all on this log, please check your internet connection from your server
Once you have a green ‘success’ message on this log, you typically wouldn’t need to keep referring to the log page (unless you find a photo has not arrived, of course).
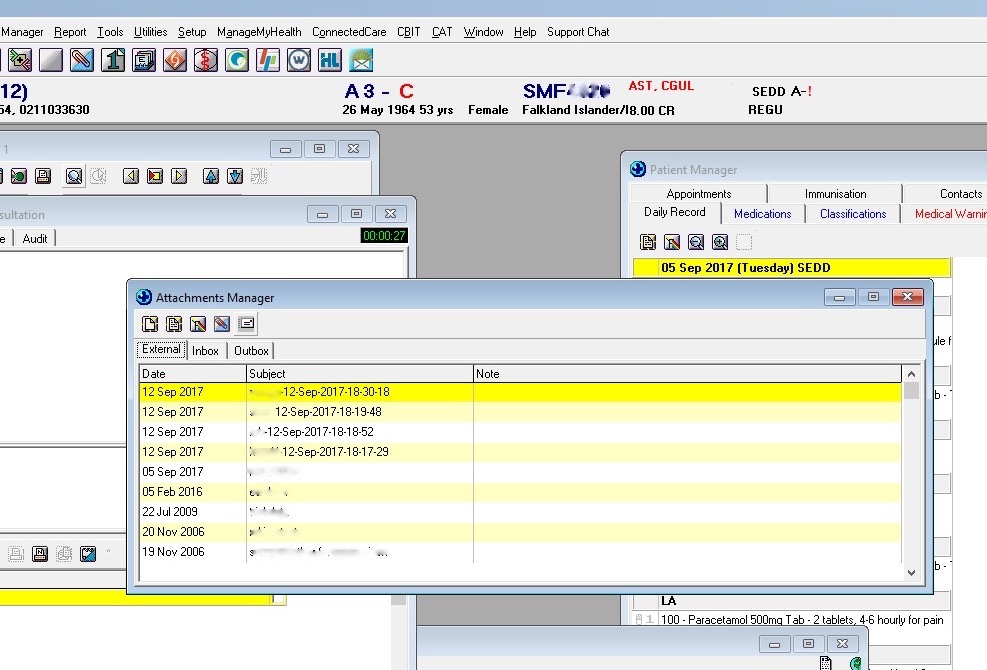
You then need to close and re-open the record for that patient, from within your EHR interface. The new photo should be visible, and clickable. E.g.
Configuring Pop-up Error Messages
A photo can fail to be added to your EHR system for various reasons, and if you aren’t checking the live log, you may be surprised when you come back at a later date to check on the same patient, and find the photo isn’t there. Reasons for a failure to insert a photo may include
- Duplicate patient records with the same ID
- Mis-spelt patient IDs
- An incorrect naming format
You can configure this using the ‘Error Notification URL’ option under the ‘Advanced Options’ button (in ver >= 0.6.4 of the EHR Connector) .
The idea is that you enter a script’s internet URL which is called remotely whenever an error occurs. This script could send an email or some other form of notification to your team of users. A target email address, for example, could then be configured to pop-up on the user’s desktop, so there is an immediate warning. However, please be aware that fairly sensitive information may be passed in the error message, so secure email is recommended.
We have an existing AtomJump Messenger script for this purpose, that sends a secure message, and can give this URL out to customers of the service. Please contact us for further details. However, many people will want to have their own customized setup. We recommend SMTP2GO as a reliable email sender to handle outgoing mails from your MedImage Server.
Advanced Configurations
In many circumstances, you will want your files to appear in this format:
C:\PathToPhotosFolder\IDFolder\Filename.jpg
However, if you are using sub-folders to represent parts of the body i.e.
C:\PathToPhotosFolder\IDFolder\BodyPartSubfolder\Filename.jpg
then you will likely want to use the following inside the EHR Connector tab, under the Advanced settings:
Photo file path match:
(.*)\\(.*)\\(.*)\\(.*)\.(jpg|mp4|mp3|pdf)
Order of components in path:
parentphotodir,NHID,subfolder,photoname
where the orange text is additional to the standard settings.
Developers: Building Your Own
To create your own EHR connection package, use this project as a template. The only files you will need to change are:
1. ehrconnect.json
Which should include queries specific to your database and system tables. Make sure you have valid JSON (use an online json validator)
2. odbc\*
The ODBC driver .exe or .msi that your database requires should be in here
3. medimage-installer.json
You should change the install commands to install your ODBC driver file silently.
Once you have changed the files, you should .zip the project up, and make it accessible to your users to install on the internet via the MedImage Server Add-on installer. If you are using github.com for development, you can do a ‘release’, and the link to the .zip file can be used by end-users. MedImage are always happy to add newly compatible EHR projects to our own list, also.
An example ehrconnect.json file
{
    "photoPathMatch": "(.*)\\\\(.*)\\\\(.*).jpg",
    "photoVars": ["parentphotodir", "NHID", "photoname"],
    "testConnectionSQL": "SELECT * FROM ATTACHMENTSMGR ORDER BY WHENADDED DESC ROWS 1;",
    "testConnectionShowField": "PATHTOFILE",
    "createUserSQL": "GRANT ALL ON ATTACHMENTSMGR TO MEDIMAGE; GRANT SELECT ON PATIENT TO MEDIMAGE; GRANT SELECT ON ANYBODY TO MEDIMAGE;",
    "getIdSQL": "SELECT ANYBODYANY.ANYBODYID AS ANYBODYID FROM PATIENT ANYBODYPAT LEFT JOIN ANYBODY ANYBODYANY ON ANYBODYANY.ANYBODYID = ANYBODYPAT.PATIENTID WHERE ANYBODYANY.ROWINACTIVE = 0 AND ANYBODYPAT.NHINO = '[NHID]';",
    "insertAttachmentSQL": "INSERT INTO ATTACHMENTSMGR (ANYBODYID, WHENADDED, DESCRIPTION, NOTE, PATHTOFILE, FILESIZE, ROWINSERTWHEN, ROWINSERTSTAFF, ROWINSERTCOMPUTER, ROWINSERTLOCATION, ROWEDITWHEN, ROWEDITSTAFF, ROWEDITCOMPUTER, ROWEDITLOCATION, ROWINACTIVE, EXTRACONVERSIONDATA) VALUES ('[patientID]','[currentDateTime]','[photoname]','','[fullphotopath]',[filelength],'[currentDateTime]','[staffname]','[computer]','[location]','[currentDateTime]','[staffname]','[computer]','[location]',0,NULL);",
    "host": "localhost",
    "dbname": "C:\\MT32\\data\\MT32.ib",
    "username": "SYSDBA",
    "password": "masterkey",
    "staffname": "#sys",
    "computer": "",
    "localFolderMapDown": "C:\\mt32\\",
    "mapDownTo": "M:\\",
    "location": "M",
    "useResized": false,
    "parentPhotoDir": "C:\\MT32\\Attachments",
    "useODBC": true,
    "dsnHere": "medtech32",
    "logging": true,
    "capitaliseNHID": true,
    "dbCurrentTimeSQL": "CURRENT_TIMESTAMP"
}
The most crucial fields that need to be altered are testConnectionSQL, testConnectionShowField, createUserSQL, getIdSQL, insertAttachmentSQL and dbCurrentTimeSQL.
testConnectionSQL. Connection test query. SQL command to check the connection to the EHR database and get the last photo record added. Renamed to ‘testConnectionQuery’ for the EHR Connector >= 0.7.10, but ‘testConnectionSQL’ is still compatible.
testConnectionShowField. Connection test field to highlight. The table field name to show for the last record entered, once there is a successful connection test.
createUserSQL. Give MEDIMAGE user permissions queries. SQL command(s) to give the ‘MEDIMAGE’ user it’s permissions. Separate queries by semi-colons ‘;’. This helps differentiate who should support any associated problems. Renamed to ‘createUserQuery’ for the EHR Connector >= 0.7.10, but ‘createUserSQL’ is still compatible.
getIdSQL. Get identifier query. SQL command to output the internal database patient ID from an incoming [NHID] word. Renamed to ‘getIdQuery’ for the EHR Connector >= 0.7.10, but ‘getIdSQL’ is still compatible.
insertAttachmentSQL. Insert attachment query. SQL command to insert the new photo attachment into the patient record table. Words that are replaced with their correct values are ‘patientID,currentDateTime,photoname,fullphotopath,filelength,staffname,computer,location’. Renamed to ‘insertAttachmentQuery’ for the EHR Connector >= 0.7.10, but ‘insertAttachmentSQL’ is still compatible.
dbCurrentTimeSQL. Database Current time. SQL function representing the current time field. This may be e.g. ‘CURRENT_TIMESTAMP’. Renamed to ‘dbCurrentTimeQuery’ for the EHR Connector >= 0.7.10, but ‘dbCurrentTimeSQL’ is still compatible.
You will find a full commercial file, with all the fields here.
An example medimage-installer.json file, which is documented in the developer guide under the ‘Writing and Add-on installer’ heading.
{
  "author": "AtomJump.com",
  "name": "ehr-medtech32",
  "description": "MedTech32 config for EHR Connector Add-on for MedImage",
  "version": "0.0.1",
  "private": false,
  "license": "MIT License",
  "installCommands": {
       "all": [
             "npm install",
              "node install.js first"
        ],
        "win32": [
              "C:\\medimage\\addons\\ehr-medtech32\\odbc\\odbcibinstall.exe /S"
        ],
        "win64": [
              "C:\\medimage\\addons\\ehr-medtech32\\odbc\\odbcibinstall.exe /S"
        ],
        "unix": [
        ],
        "mac": [

        ]
  },
   "uninstallCommands": {
       "all": [
              "node uninstall.js"
        ],
        "win32": [
        ],
        "win64": [
        ],
        "unix": [
        ],
        "mac": [
        ]
  }
}
Additional Features in Ver >= 0.7.10
The changes available in the EHR Connector >= 0.7.10 allow
- interaction with SOAP XML programmer interfaces
- interaction with JSON programmer interfaces
- multiple SQL queries for enhanced SQL-type interaction
- a simplified user interface
To include multiple lines within a given query field use the ‘\r\n’ character codes.
Complete Field List
You will find a complete list of additional fields and their descriptions on the EHR fields page.