The Cloud Server
Configuration Options
Windows Cloud Setup
Multiple MedImage servers installed on the same Wifi Network
Multiple MedImage servers installed on a single physical server
Migrating from one MedImage installation to another
System Overview Options
Post Installation Options
Troubleshooting
Add-ons
Phone errors
The Cloud Server
This product is also known as the ‘MedImage Proxy Server’.
Reason: In a straightforward installation, customers can use the ‘AJ’ pairing button, which are MedImage’s own equivalent cloud servers (‘AJ’ is short for AtomJump, the developers of MedImage). There is a modest cost of NZ$3 / doctor/ month for using the ‘AJ’ service.
However, and usually for security reasons, you can choose to keep data entirely on your own network with your own MedImage Cloud Server, replacing the ‘AJ’ cloud. This option is free, if you already have your our own physical cloud/web servers, or are renting them.
Note: The MedImage Cloud downloadable software is a single node of the software that powers AtomJump’s own ‘AJ’ cloud. In addition, AtomJump’s own cloud has multiple load-balanced nodes, and an automatic fail-over system, which are not described here.
Supports: Depending on the server hardware, each MedImage Cloud node should be able to handle up to several hundred doctor’s practices with an average of 7 doctors using the service regularly.
Note: this section requires technical and system administration knowledge.
What you will need: a Linux (or Windows) web server with an incoming and outgoing internet connection. Any number of practices with their own Windows Servers, potentially in different physical premises or in a hosted environment.
The setup: your Cloud server will receive photos over a Wifi internet connection, or via a mobile data network from your doctor’s mobile phones. The mobile phones are associated uniquely with each practice’s different MedImage Servers (via a one-time pairing code). A photo will stay on the cloud server for a few seconds before being downloaded to that doctor’s own MedImage Server machine, and then be removed from the cloud server.
Cloud Setup
On your internet server, first install NodeJS and npm. See these install scripts, but there are multiple ways to do this depending on your platform e.g. MacOSX specific instructions are here. Note, Windows server users should install the Cloud Servers from the Download page and you do not need to follow the steps in this section below, however there are some configuration options which are required (see Windows Cloud Setup below).
Then
eval "$(curl -fsSL -H 'Cache-Control: no-cache' https://git.atomjump.com/medimageserv-linstaller.git/install)"
And run the command it outputs, to get autostart at boot-up.
Then open the firewall to port 5566 for reading and writing eg.
sudo ufw allow 5566/tcp
See more details on a Ubuntu firewall setup in this article.
To track logs:
pm2 logs
For further details about starting and stopping the server see PM2 and the MedImage technical README.
Windows client practice setup
Download and run the installable MedImage Server in each client practice. Usually you will only need to do this once per practice, on the Windows Server system that holds the Practice Management System. Note: you will likely need to do this as an Administrator.
Enter the URL of your MedImage Cloud server, from above, under the 3rd large button in the practice’s MedImage Server, when pairing eg. ‘http://myproxy.mycompany.com:5566’
Phone setup
Run the app and click the large circle. It should mention that you can enter your 4 digit pairing code.
Enter the patient id in the box at the top, specific to each photo. eg.
John123 moles
Click the large icon to start taking photos, and they will appear after a few seconds on your Windows Server. It should be sent to the folder you specify when you installed the MedImage Server (or particularly for MedTech users, C:\mt32\attachments), inside a subfolder named the first word that you enter (in this case ‘\John123’).
You can then make the target Windows Server’s folders visible to client desktop PCs, usually via a ‘shared drive letter’.
Configuration options
- You can back-up the photos as they arrive on any MedImage server to other drives or folders on the same drive. Edit the config.json file in the server’s directory.
"backupTo": [
                    "C:/your/folder",
                    "D:/your/second/drive",
                    "/linux/directory
              ],
Note the forward-slashes are needed on Windows and Linux, rather than back-slashes
- You can use a secure https server with
"httpsKey": "path/to/key/pem/file"
"httpsCert": "path/to/certificate/perm/file"
- You can edit the ‘onStartBackupDriveDetect’ parameter to be true. This will auto-detect other drives on starting the script, and start backing up to a MedImage/photos folder at the top of the drive.
"onStartBackupDriveDetect": true,
- Tip: JSONLint is a great tool for confirming you have a valid .json file.
- Web Proxy. If your browsers usually require a proxy server (i.e. for normal web requests), then use the option
"webProxy": "http://yourUser:yourPassword@webProxyIPaddress:webProxyPort"
- You can switch a server into ‘lock down’ mode, where the interface cannot change any settings, add-ons, or see any technical logs, by setting
"lockDown": true
- Some add-ons need a human readable password for light security. This is a global password visible only within the config file (but anyone with file level access to the server can see this), and you should change the default ‘changeme’ password if you intend to use these add-ons. Server Ver >= 1.3.8
"basicAuthent": "changeme"
- Provide the ability to upload additional file types other than basic .jpg photos, e.g. PDF. You need to specify the allowed extension and MIME type in a new array element e.g. { “extension”: “.pdf”, “mime”: “application/pdf” }. Server Ver >= 1.5.0.
"allowedTypes" : [ { "extension": ".jpg", "mime": "image/jpeg" }, { "extension": ".pdf", "mime": "application/pdf" }, { "extension": ".mp4", "mime": "video/mp4" }, { "extension": ".mp3", "mime": "audio/mpeg" } ] - Configurable maximum upload file sizes, in bytes (so the default is 16MB). This is useful for e.g. modern iPhones, which have a large default photo size. Server Ver >= 1.8.5.3, or Cloud Server Ver >= 1.9.0.
"maxUploadSize" : 16777216
- To enable MedImage ‘browser-app’ uploads, you will need to insert a set of CORS headers. You can also enable custom HTTP headers. Server Ver >= 1.8.5.4, or Cloud Server Ver >= 1.9.6.
 "headers" : [ { "header": "Access-Control-Allow-Origin", "value": "*" },
          { "header": "Access-Control-Request-Method", "value": "*" },
          { "header": "Access-Control-Allow-Headers", "value": "*" },
          { "header": "Access-Control-Allow-Methods", "value": "OPTIONS, GET, POST" } ]
Windows Binary Cloud Setup
Note: for a Windows Cloud setup, you should use the MedImage Cloud Windows binary >= 1.8.7 from the Download Page.
After the installation of the MedImage Cloud on your internet-connected Windows Server, edit the config.json file in the server’s directory (usually C:\MedImage\config.json), and set these values:
"backupTo": null,
"allowPhotosLeaving": true,
"allowGettingRemotePhotos": false,
"lockDown": true,
(note: no web server is required)
Then restart the MedImage service in the ‘services’, or restart your machine.
Multiple MedImage servers installed on the same Wifi Network
Currently, this configuration is not fully supported with fast WiFi scanning/sending. The app will choose the first MedImage server that it finds, which could result in photos being sent to the wrong PC.
Instead, each phone should be paired with the corresponding PC manually, and you should select ‘no’ when asked ‘Do you want to connect via WiFi, if it is available, also?’ during the pairing. The phone will still potentially use a Wifi network to upload, but it will go via the internet before coming down to the PC.
Multiple MedImage servers installed on a single physical server
This is possible in both Windows and Linux. You should install the server software to another, non-standard folder on the drive (on Windows, copy the files in C:\medimage to another folder), edit the config.json file in the new folder’s root directory, change the port number to something other than 5566, e.g. 5567, and change the target folder, if necessary.
On Windows, you will likely want to install a new service to run the new server in parallel to the first. E.g. for an installation called ‘medimage2’, run in an administrator’s ‘cmd’ window:
C:\medimage2\nssm.exe install medimage2 "C:\Program Files\nodejs\node.exe" "C:\medimage2\bin\server.js" "5567"
C:\windows\system32\net.exe start medimage2
and to uninstall
C:\windows\system32\net.exe stop medimage2
C:\medimage2\nssm.exe remove medimage2 confirm
Migrating from one MedImage installation to another
If you are testing out a new installation, while keeping an old installation in live operation, you should use a new global ID on the new installation during the testing phase – this will happen naturally when you install it.
If you wish to keep all existing phones synced correctly when you take the new installation live, you will need to transfer the ID from the old installation to the new one. You can expect a few minutes of down-time for this procedure:
1. Stop the MedImage service on both the old installation and the new installation, in Windows Services. This prevents any installation conflicts.
2. Copy across the following ID fields from the old C:\MedImage\config.json into the new C:\MedImage\config.json.
globalId: "bS6FpXvwagUbeMIXnM" readProxy: "https://medimage-nz1.atomjump.com/read/bS6FpXvwagUb transfer: 45652482eMIXnM "
Note: The green values should be the same within any one config file.
Note 2: The readProxy subdomain e.g. “medimage-nz1” should also be the same as previously.
3. Restart the MedImage service on the new installation. You should be live now.
4. You might wish to rename the old installation’s C:\MedImage\config.json to C:\MedImage\config-old.json, to completely prevent an accidental reboot from causing the old server to conflict with the new installation, while you are testing the new live installation.
5. Once you are happy with the new live installation, uninstall the old installation’s MedImage Server through the regular Windows ‘Add or Remove Programs’.
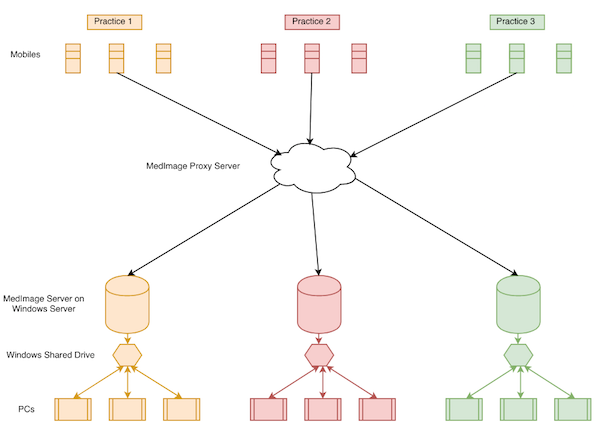
System Overview Options
Here are some possible configurations for integration with your existing medical systems:
- MedImage server on each PC
- MedImage Server on each PC, with your own proxy server
- MedImage Proxy server on your application server
- MedImage Server on Windows Servers with shared drives (e.g. Primary Health organisations)
One common scenario within a single practice:
- A single Windows hardware server
- Multiple Windows desktop PCs
- A single MedImage Server installed on the Windows server
- Each desktop has a desktop link to the IP address/URL of the MedImage Server, to either the homepage of the MedImage Server or to the page that generates a 4-digit connection code immediately (and/or the EHR Log if the EHR Connector is installed)
Post Installation Options
Creating a shortcut on the desktop
Often the MedImage Server is kept on a central Windows server, and there are a number of client desktop PCs which need to have a view of that software on that server. This is most conveniently done by created a URL desktop shortcut with the URL to the MedImage Server on it on the desktop machine. E.g. ‘http://yourwindowsserver:5566’. Some users choose to point this desktop icon at the ‘generate a new 4 digit code’ page, to allow an easy intro for any new doctors. Note: you may want to put the software into ‘lockDown’ mode before spreading this across all users (see Options above).
Lock Down Mode
‘Lock-down’ mode prevents any users from changing settings through the web interface, such as the target folder of MedImage, installing new add-ons, or seeing any technical logs. You need to have access to the server at a file level, and be able to edit text files to switch this on and off. Notepad++ is a recommended Windows tool for this.
Troubleshooting
If you are having issues with photos not appearing or being transferred to a target folder, particularly on a Windows server, firstly check that the photos are arriving in the C:\MedImage\photos folder. If they are, but they haven’t moved into the target folder, the most common problem is a permissions issue. On Windows, check that the user that installed the MedImage Server had administrative privileges, and is able to read and write to the target folder. Any network drive mappings should be available to the user that installed MedImage Server, when run as a background service, but if not, you can also try the network path e.g. \\server\folder format.
Common problems with Windows network drives:
a) The Local System user (that may have installed the server software) often won’t know about the network drive letter. In this case you can try the raw network path e.g. ‘\\server\path’
b) An admin user (or in particular the local system user) may not have permissions on that path. You can read more about this here. The admin user should have read and write permissions. You can enable this by setting up a folder or drive share with read and write access for the computer name itself. A MedImage Server holding computer called e.g. MANGO should be shared using the title MANGO$ in the share options on the target folder.
c) You can use this as a test from an administrator command prompt, to see if you have access rights. Create a file called text.txt in Notepad. Then e.g.
copy test.txt M:\targetfolder\
If this returns an error, you know you do not have permissions.
Checking logs
The logs are available on a new installation from the MedImage Server web interface home-page (typically http://localhost:5566), and this is a good first place to check.
You can also get a live log operating by using the command line version, rather than the Windows service version. To do this, stop the Windows MedImage service temporarily, and run the server from the command-line to watch for errors. Please note: if this is a busy, live service, any delay between stopping the service and running the script could result in missed data.
1. Stop the ‘MedImage’ service through the normal Windows services
2. Run a command prompt (cmd), and enter
cd c:\MedImage
node bin\server.js
3. Take a photo from the app, and see the response logged on-screen on your PC.
Once you’re done, steps to re-enable are
4. ‘Ctrl-C’ to break the current server from within the prompt.
5. Restart the MedImage service through the normal Windows services.
Administrator rights
Remember that you should be logged in as an ‘Administrator’ user before installing MedImage server. If your machine does not already have an Admin user (which is the case with e.g. client-based Windows 10), you can run ‘cmd’ from the start bar. Right click on the black cmd icon, and click ‘Run as Administrator’.
Then enter the following line:
net user administrator /active:yes
to activate the Administrator user. Once you have logged in, choose a password, and you can then install MedImage Server.
Certificates
If you are getting certificate problems during pairing such as, “Self-signed Certificate in Certificate Chain”, and you are using the MedImage Server 1.x, you will need to upgrade your MedImage Server to ver >= 2.x. This issue was due to an updated certificate on atomjump.com not being recognised by the older software. Please see tips for upgrading on the Updates page.
If the certificate problem is “Unable to verify the first certificate”, there may be an issue at your end preventing the domains *.atomjump.com from being read correctly. We have encountered this issue with anti-virus software “ESET”, and the admin needed to whitelist *.atomjump.com (i.e. all subdomains of atomjump.com) in the anti-virus software.
If neither of the above issues resolve the problem, a lack of a recent root-server certificate could be the issue. For versions of the MedImage Server >= 2.1.2 on Windows, there is a facility to refresh the latest root certificates. Firstly delete the file
C:\MedImage\node_modules\ssl-root-cas\ssl-root-cas-latest.js
and then restart the Windows Service, twice. The file above should be regenerated on the first run, and the fresh root certificates used on the second run.
Add-ons
Add-ons provide additional features to MedImage, and are generally installed in the server’s /addons folder.
If you are a developer, you can develop your own add-ons to MedImage.
MedTech32
If the MedImage add-on settings for ‘Show Extended Options/Maps Down To’ are set to ‘M:\’, and the M drive is not visible on the server (since the file reference will be from e.g. M:\Attachments\…), you can use this work-around:
- You can switch the ‘Show Extended Options/Maps Down To’ setting in MedImage to ‘C:\mt32\’ on a single machine installation of MedTech32
- Or, on the server you can create a mapping in a cmd prompt: ‘subst M: C:\mt32’ which maps the \mt32 folder to the M: drive.
Phone Errors
“Sorry, there was a problem removing the photo on the phone. Error code:”
You can see what went wrong from the List of Error Codes
“Sorry, there was a problem accessing the photo. Code: “
You can see what went wrong from the List of Error Codes
“Resending photo at hh:mm”
If this keeps happening, and you definitely have a working phone signal / Wifi, please try restarting the app, first. The connection should be made again and the photo resent. If it is still not connecting correctly, you can also try deleting and re-creating your connection to your MedImage Server.